> ## Documentation Index
> Fetch the complete documentation index at: https://moengage-docs-mcp-segmentation-tool-belt.mintlify.site/llms.txt
> Use this file to discover all available pages before exploring further.
# Send events from MoEngage to SFMC
> Use MoEngage Streams to send campaign interaction events to Salesforce Marketing Cloud Data Extensions for segmentation, personalization, and journey decisioning.
## Integration
**Prerequisites**
* Follow the steps mentioned in [Set up MoEngage activity in SFMC](/partner-guide/message-orchestration/marketing-cloud/salesforce-marketing-cloud-sfmc/setup-moengage-activity) to set up the MoEngage Custom Activities on Salesforce Marketing Cloud.
* This is a part of the Streams add-on. Please reach out to your dedicated MoEngage CSM (customer success manager) to get it enabled for your account.
### Step 1: Set up Streams on SFMC
To set up streams on SFMC, perform the following steps:
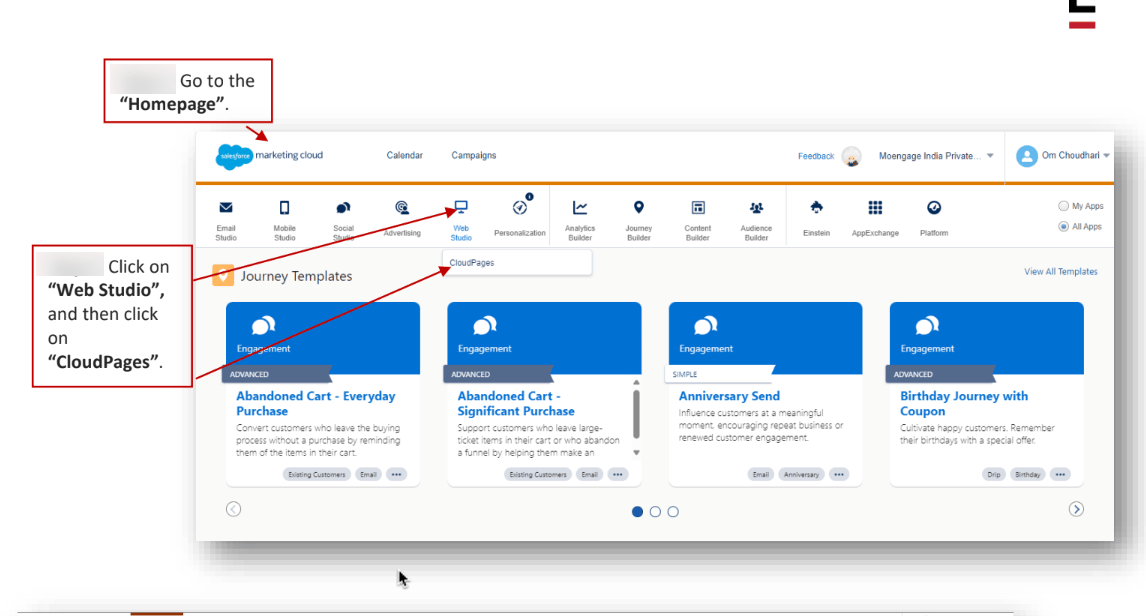
1. Go to the "Homepage".
2. Click on "Web Studio", and then click on "CloudPages".
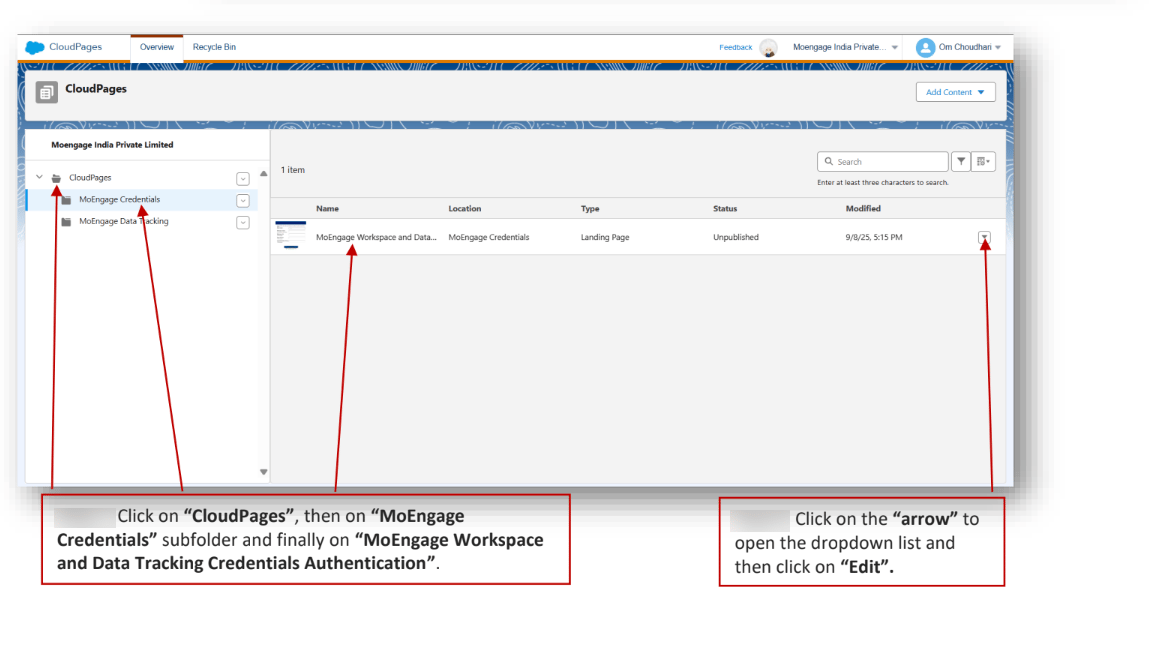
 3. Click on "CloudPages", then on "MoEngage Credentials" subfolder and finally on "MoEngage Workspace and Data Tracking Credentials".
4. Click on the "arrow" to open the dropdown list and then click on "Edit".
3. Click on "CloudPages", then on "MoEngage Credentials" subfolder and finally on "MoEngage Workspace and Data Tracking Credentials".
4. Click on the "arrow" to open the dropdown list and then click on "Edit".
 5. Click on the "Page URL" to open the Authentication Page.
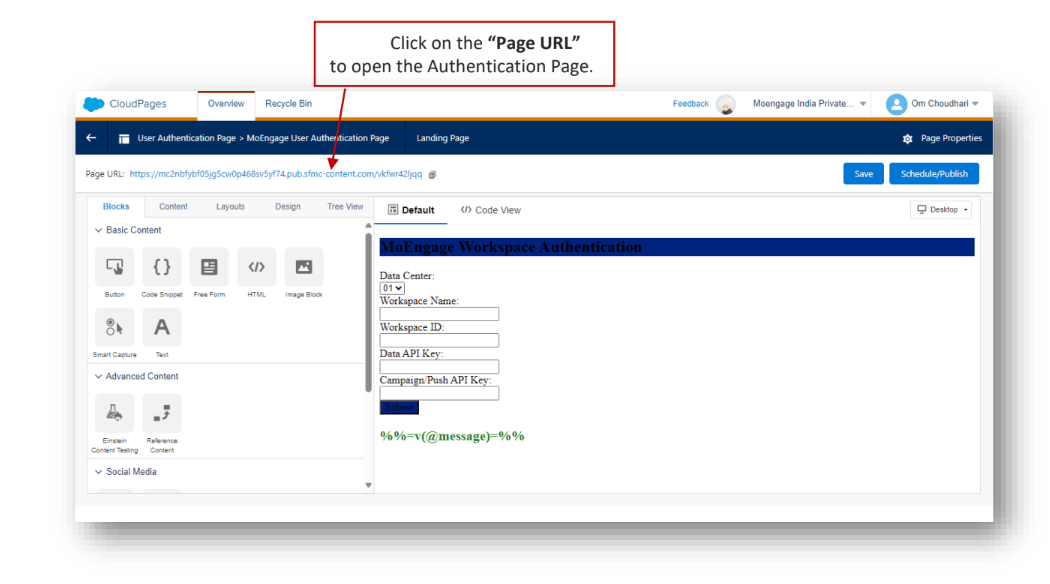 6. Select the "Data Center", then enter the "Workspace Name", "Workspace ID", "Data API Key", and "Campaign/Push API Key" from the MoEngage Platform.
7. Click on "Submit" once all the details are filled.
6. Select the "Data Center", then enter the "Workspace Name", "Workspace ID", "Data API Key", and "Campaign/Push API Key" from the MoEngage Platform.
7. Click on "Submit" once all the details are filled.
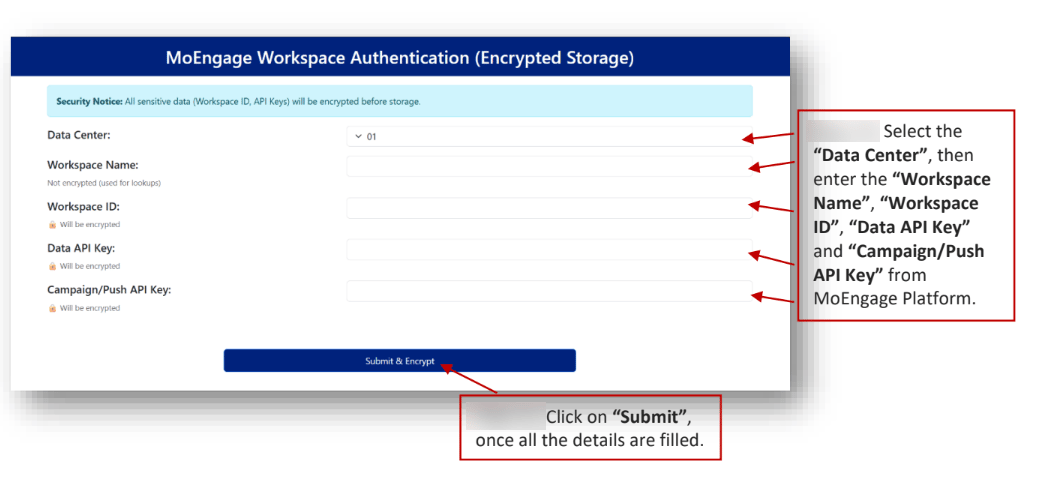 8. After submitting the credentials, they will be validated with MoEngage and securely encrypted before being stored in the **Credentials Data Extension**.
9. The second part of the CloudPage focuses on **Data Tracking Credentials**.
10. Please enter your desired **Username** and **Password** for data tracking. This information will be required when raising a support ticket with MoEngage Streams.
8. After submitting the credentials, they will be validated with MoEngage and securely encrypted before being stored in the **Credentials Data Extension**.
9. The second part of the CloudPage focuses on **Data Tracking Credentials**.
10. Please enter your desired **Username** and **Password** for data tracking. This information will be required when raising a support ticket with MoEngage Streams.
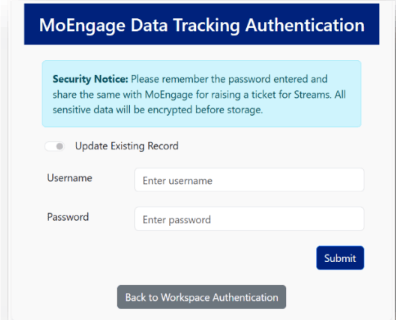 11. Ensure you remember the password you enter, as it will be encrypted and stored in the **Data Tracking Data Extension** and cannot be retrieved in plain text later.
### Step 2: Set up Streams on MoEngage
To create a [support ticket](/user-guide/contact-support/raise-a-support-ticket-through-moengage-dashboard) with MoEngage, share the following details:
* **Username**: This is the unique identifier assigned to your MoEngage account, used for authentication purposes.
* **Password**: The unencrypted password entered in the **CloudPage**. Although the password is encrypted and stored in the **Data Extension** for security, the unencrypted version is required when raising the support ticket.
* **URL**: The URL of the published MoEngage Campaign Tracking **CloudPage**.
Ensure all information is accurate before sharing it with MoEngage Support.
### Step 3: Activate Streams Data Simplification Automation on SFMC
This process converts the raw event data MoEngage sends into a structured, usable format for SFMC segmentation, personalization, and journey creation.
#### Automation function
The automation performs the following key functions:
* It reads new rows from the Raw MoEngage Data Track Data Extension.
* It parses and simplifies the nested event data JSON.
* It writes the processed records into the final MoEngage Data Track Data Extension.
* It marks the original raw records as processed to prevent data duplication in subsequent runs.
#### Activation steps
To enable the data simplification process in SFMC, perform the following steps:
1. Go to "Automations" and navigate to the "MoEngage-SFMC" folder.
11. Ensure you remember the password you enter, as it will be encrypted and stored in the **Data Tracking Data Extension** and cannot be retrieved in plain text later.
### Step 2: Set up Streams on MoEngage
To create a [support ticket](/user-guide/contact-support/raise-a-support-ticket-through-moengage-dashboard) with MoEngage, share the following details:
* **Username**: This is the unique identifier assigned to your MoEngage account, used for authentication purposes.
* **Password**: The unencrypted password entered in the **CloudPage**. Although the password is encrypted and stored in the **Data Extension** for security, the unencrypted version is required when raising the support ticket.
* **URL**: The URL of the published MoEngage Campaign Tracking **CloudPage**.
Ensure all information is accurate before sharing it with MoEngage Support.
### Step 3: Activate Streams Data Simplification Automation on SFMC
This process converts the raw event data MoEngage sends into a structured, usable format for SFMC segmentation, personalization, and journey creation.
#### Automation function
The automation performs the following key functions:
* It reads new rows from the Raw MoEngage Data Track Data Extension.
* It parses and simplifies the nested event data JSON.
* It writes the processed records into the final MoEngage Data Track Data Extension.
* It marks the original raw records as processed to prevent data duplication in subsequent runs.
#### Activation steps
To enable the data simplification process in SFMC, perform the following steps:
1. Go to "Automations" and navigate to the "MoEngage-SFMC" folder.
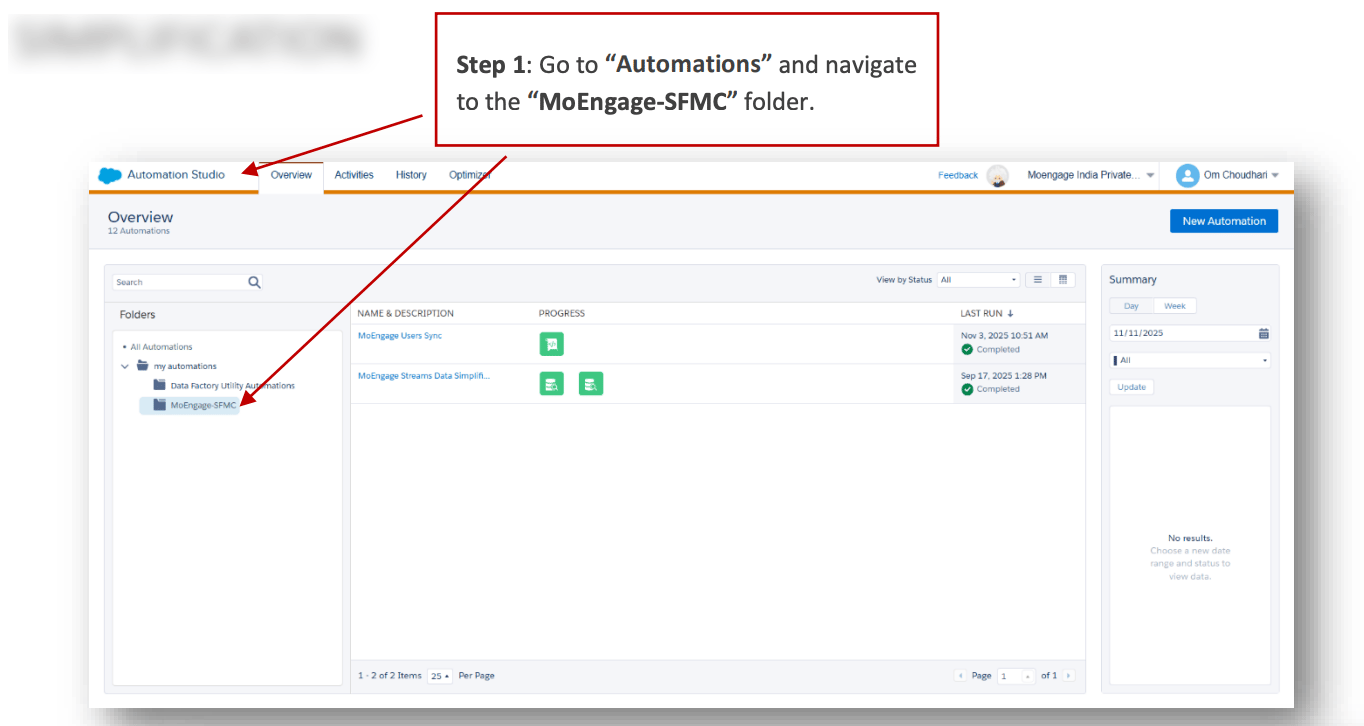 2. Navigate to the Automations tab and open the designated "MoEngage-SFMC" folder.
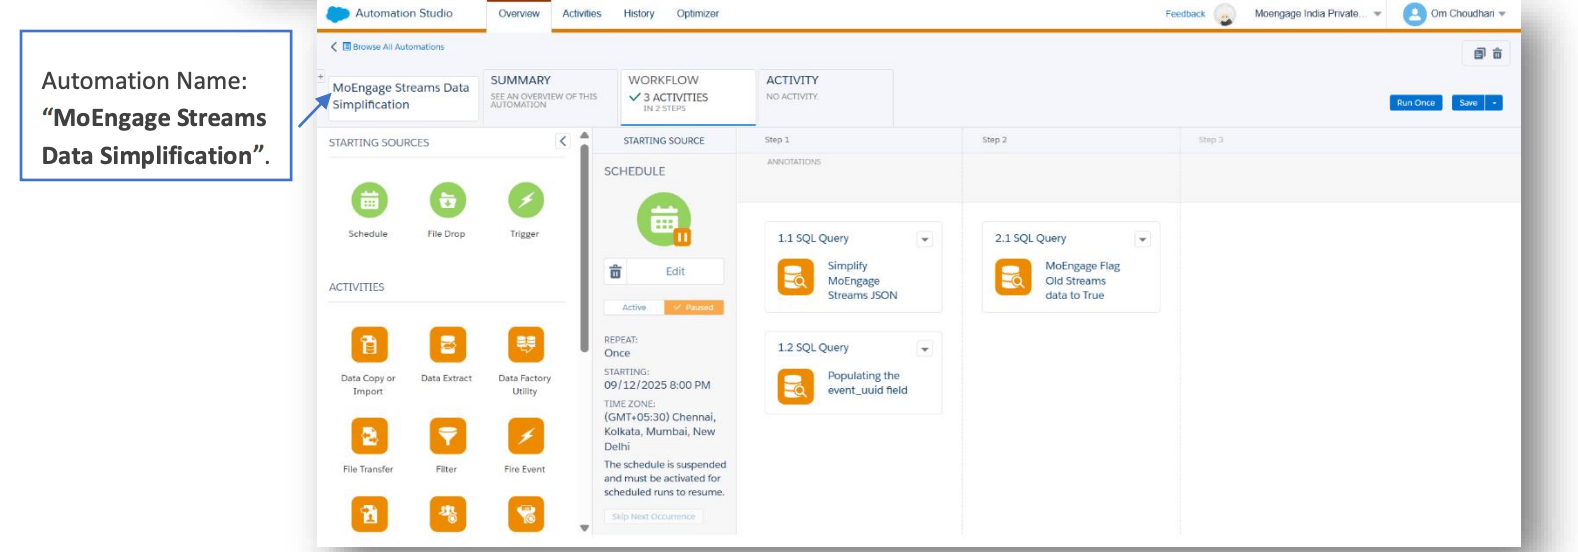
3. Locate the automation named "MoEngage Streams Data Simplification".
This automation must be scheduled no more frequently than once every 15 minutes to ensure optimal performance and avoid throttling SFMC resources. A 30-minute or hourly schedule is generally recommended. You can also run it on demand.
2. Navigate to the Automations tab and open the designated "MoEngage-SFMC" folder.
3. Locate the automation named "MoEngage Streams Data Simplification".
This automation must be scheduled no more frequently than once every 15 minutes to ensure optimal performance and avoid throttling SFMC resources. A 30-minute or hourly schedule is generally recommended. You can also run it on demand.
 ### Step 4: Verify configuration
To verify the configuration, perform the following steps:
1. Confirm all required fields are correctly filled in the **MoEngage Tracking Credentials Data Extension**.
2. Verify that the MoEngage Support team has received the required credentials and that the campaign tracking setup is complete.
3. After MoEngage Streams is configured, interaction data will be sent to the specified **CloudPage** if the **Event Name** is included in the Streams config.
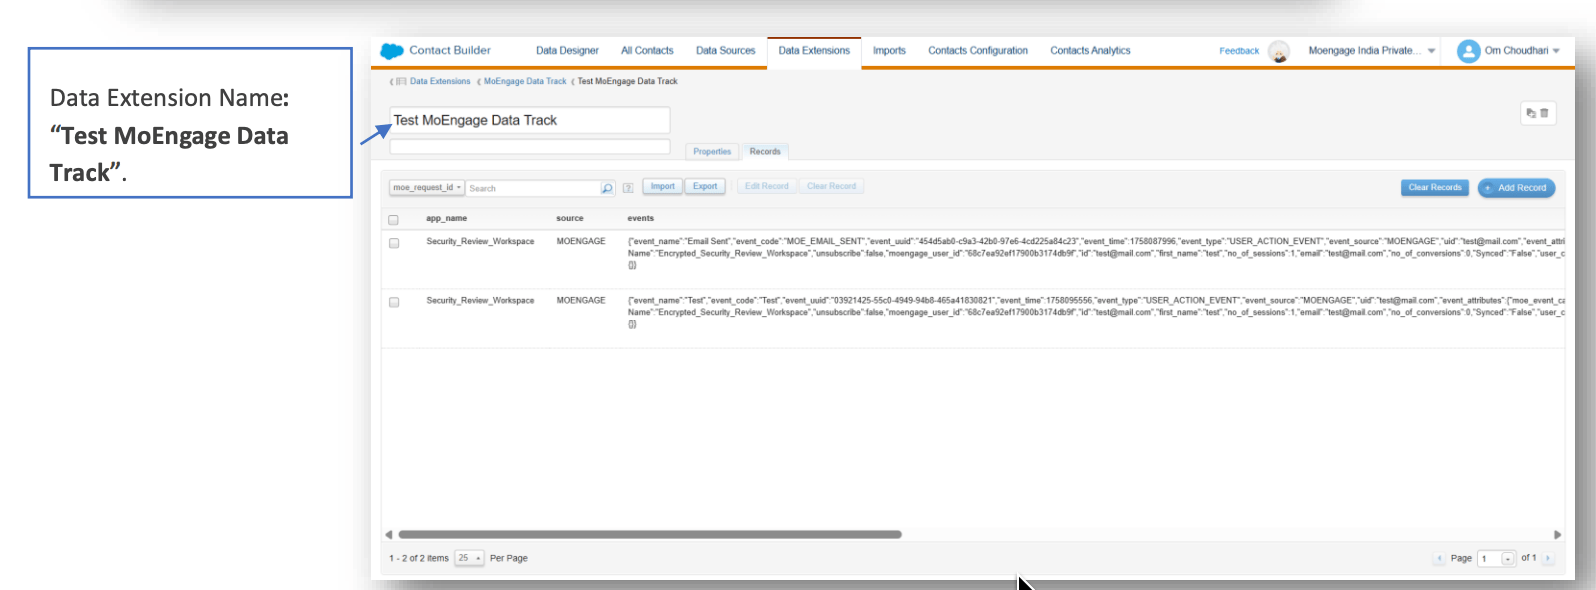
4. Make sure the **Test MoEngage Data Track** Data Extension is set up, so it receives test tracking data from **Streams** via the **CloudPage**.
5. Ensure the **MoEngage Streams Data Simplification** automation is active.
6. Confirm that the **MoEngage Data Track Data Extension** is properly configured and accessible.
### Step 5: View Streams data in SFMC
This section helps you validate that events sent from MoEngage are successfully processed within your SFMC Data Extensions.
#### Simplified Data Target: MoEngage Data Track DE (Data Extension)
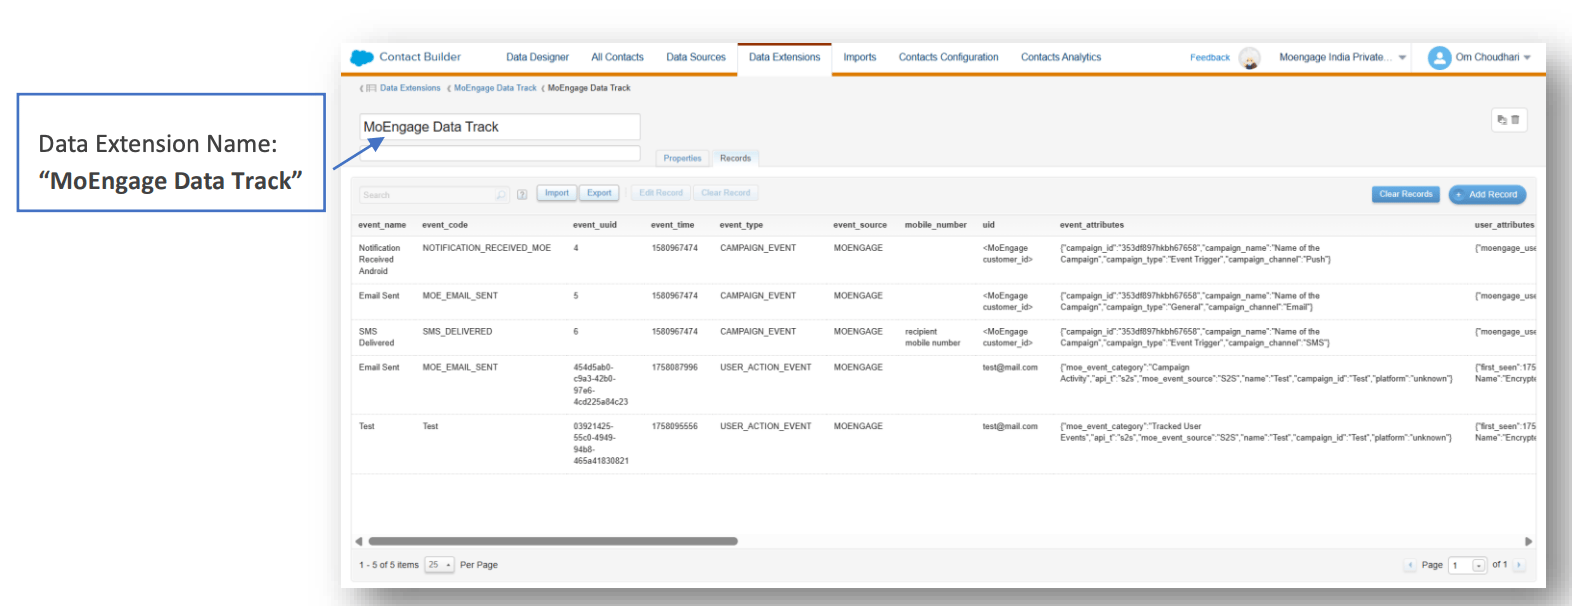
This Data Extension stores a simplified version of event data after it has been parsed and processed by the MoEngage Streams Data Simplification automation. Use this Data Extension in your Journey Builder for personalization, decision-making, and so on.
To access the MoEngage Data Track Data Extension, perform the following steps:
1. Go to "Data Extensions" and navigate to the "MoEngage Data Track" folder.
### Step 4: Verify configuration
To verify the configuration, perform the following steps:
1. Confirm all required fields are correctly filled in the **MoEngage Tracking Credentials Data Extension**.
2. Verify that the MoEngage Support team has received the required credentials and that the campaign tracking setup is complete.
3. After MoEngage Streams is configured, interaction data will be sent to the specified **CloudPage** if the **Event Name** is included in the Streams config.
4. Make sure the **Test MoEngage Data Track** Data Extension is set up, so it receives test tracking data from **Streams** via the **CloudPage**.
5. Ensure the **MoEngage Streams Data Simplification** automation is active.
6. Confirm that the **MoEngage Data Track Data Extension** is properly configured and accessible.
### Step 5: View Streams data in SFMC
This section helps you validate that events sent from MoEngage are successfully processed within your SFMC Data Extensions.
#### Simplified Data Target: MoEngage Data Track DE (Data Extension)
This Data Extension stores a simplified version of event data after it has been parsed and processed by the MoEngage Streams Data Simplification automation. Use this Data Extension in your Journey Builder for personalization, decision-making, and so on.
To access the MoEngage Data Track Data Extension, perform the following steps:
1. Go to "Data Extensions" and navigate to the "MoEngage Data Track" folder.
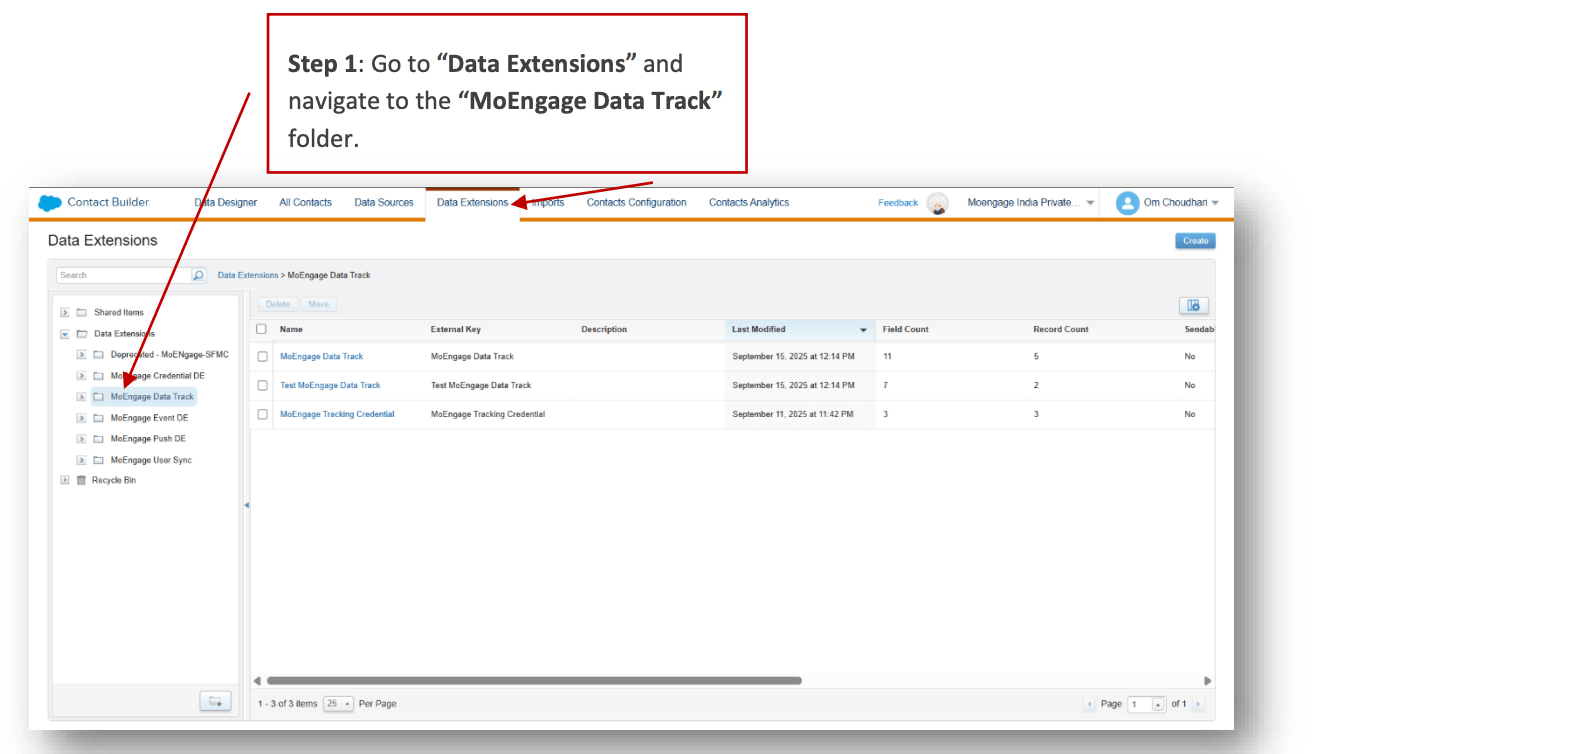 2. Locate the Data Extension folder named "MoEngage Data Track".
 #### Raw Event Storage: Test MoEngage Data Track DE (Data Extension)
This Data Extension stores the raw event data exactly as received from the MoEngage Streams HTTP POST payload captured in JSON format.
To test the MoEngage Data Track Data Extension (DE), perform the following steps:
1. Go to "Data Extensions", then select "MoEngage Data Track".
#### Raw Event Storage: Test MoEngage Data Track DE (Data Extension)
This Data Extension stores the raw event data exactly as received from the MoEngage Streams HTTP POST payload captured in JSON format.
To test the MoEngage Data Track Data Extension (DE), perform the following steps:
1. Go to "Data Extensions", then select "MoEngage Data Track".
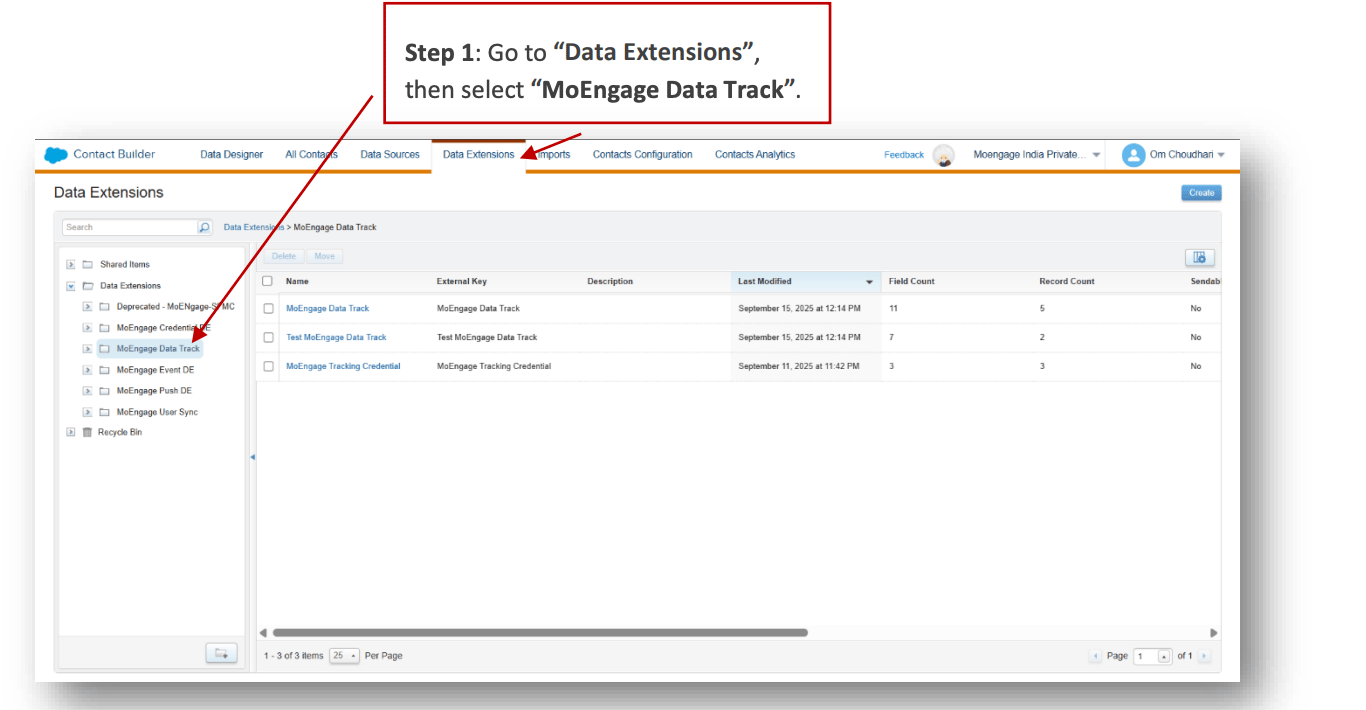 2. Locate the Data Extension folder named "Test MoEngage Data Track".